Why stucco fails in Colorado
Before I get to the tests, let me explain what I'm looking for.
Stucco is a cementitious material—a mix of Portland cement, sand, lime, and water. It's applied in three coats: a scratch coat (the first layer, scratched to create a mechanical key for the next coat), a brown coat (the leveling coat), and a finish coat (the textured top layer).
In Colorado's climate, stucco faces three threats:
Freeze-thaw cycling: Water gets into the stucco, freezes overnight, expands, and cracks the surface. The crack allows more water in, and the cycle repeats. This is the most common failure mode I see.
Lack of drainage: Stucco is not waterproof. It's designed to be a water-resistant barrier that allows moisture to drain behind it. If the drainage details are wrong—no weep screed, no drainage mat, no proper flashing—water sits against the sheathing and rots it.
Improper curing: Stucco needs to cure slowly and evenly. If it dries too fast—common in Colorado's low humidity—it develops shrinkage cracks that allow water intrusion.
The tests I run are designed to detect all three failure modes.
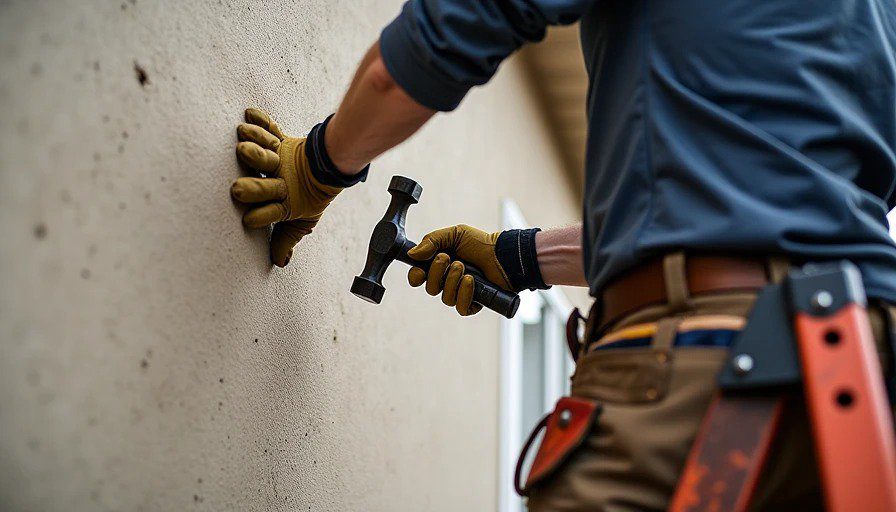
Test 1: The Hammer Test (10 seconds)
The hammer test is a simple auditory test. You tap the stucco surface with a hammer or the back of a screwdriver and listen to the sound.
What you're listening for:
A solid, high-pitched "tink" sound: This indicates the stucco is well-bonded to the substrate. It means the scratch coat was properly applied, the lath is secure, and the stucco has good adhesion. This is the sound you want to hear.
A hollow, low-pitched "thud" or drum-like sound: This indicates the stucco is delaminating from the substrate. There's an air gap between the stucco and the sheathing. That gap allows water to collect behind the stucco, and it will eventually cause failure.
A rattling or buzzing sound: This indicates the lath (the metal mesh that reinforces the stucco) is loose or improperly attached. This is a more serious failure—the stucco is moving independently of the structure.
The data: In a properly installed stucco job, you should hear a solid "tink" sound across the entire surface. I've inspected stucco jobs where I could hear hollow spots over 30% of the wall—all in the first winter after installation. Those hollow spots are where water will collect and freeze, and where the first cracks will appear.
What I've observed: I've run the hammer test on about 50 stucco jobs over the last 10 years. About 40% have at least one hollow spot indicating poor bonding or a missing drainage plane. In new construction, the rate is about 20-25%. In renovations—where stucco has been patched or re-coated—the rate is closer to 50%.
Test 2: The Peel Test (5 minutes)
The peel test is more invasive—it requires cutting a small opening in the stucco. But the information it provides is essential.
What you do:
Cut a 4-inch square opening in the stucco at the bottom of the wall, about 6 inches above the ground.
Peel back the stucco carefully to expose the layers.
Check:
The thickness of the stucco (minimum 3/4 inch total)
The presence and condition of the lath
The presence of a drainage plane (typically a drainage mat or a gap behind the lath)
The condition of the sheathing underneath
The presence of a weep screed at the bottom of the wall
What to look for:
The thickness: The stucco should be 3/4 inch to 1 inch thick. If it's less than 3/4 inch, it's too thin—it won't provide adequate protection and will crack more easily. I've seen stucco that was only 1/2 inch thick, applied directly over the sheathing.
The lath: The metal lath should be properly attached to the framing, with the stucco embedded in it. If the lath is rusted, the stucco is delaminating from the lath. If the lath is missing entirely, the stucco is not reinforced.
The drainage plane: There should be either a drainage mat—a 1/4-inch or 3/8-inch material that creates an air gap between the sheathing and the stucco—or a gap behind the lath. If the lath is attached directly to the sheathing with no drainage gap, water will sit against the sheathing and rot it.
The sheathing condition: The sheathing behind the stucco should be dry and intact. If it's stained, soft, or shows signs of mold, water is getting in.
The weep screed: At the bottom of the wall, there should be a weep screed—a metal strip with small holes that allow water to drain out. If the weep screed is missing or covered by the stucco, water will be trapped behind the stucco.
What I've observed: About 30% of the stucco jobs I've inspected are missing the drainage plane entirely. Another 20% have a drainage plane that was compromised or inadequately detailed. The most common issue is a missing weep screed or a weep screed that's been covered by stucco or grading.
What the tests reveal (and the data)
Issue | Hammer Test result | Peel Test result | Frequency (my inspections) | Consequence |
|---|---|---|---|---|
Delamination | Hollow sound ("thud") | Stucco separates from lath | 40% of jobs (at least 1 hollow spot) | Water collects behind stucco; freeze-thaw cracks; wall rot |
Missing drainage plane | Often sounds solid (stucco is bonded, but wrong) | No drainage mat; lath against sheathing | 30% of jobs | Water trapped against sheathing; rot; mold; structural failure |
Insufficient thickness | Often sounds solid | Less than 3/4 inch total | 15% of jobs | Cracking; reduced insulation; water intrusion |
Missing weep screed | Hollow at bottom | No weep screed or it's covered | 20% of jobs | Water trapped at base; rot; insect damage |
Lath corrosion | Hollow or rattling | Rusted lath, stucco separating | 10% of jobs (older homes) | Stucco falls off; structural weakness |
Improper curing | Usually solid | Shrinkage cracks visible | 25% of jobs | Cracks allow water; freeze-thaw damage |
The most common failure modes I've found

Failure mode 1: Stucco over EIFS (Exterior Insulation and Finish System) Some homeowners have stucco that's actually EIFS—a synthetic stucco with an insulating foam layer. EIFS is harder to inspect with the hammer test, because the foam dampens the sound. But the peel test reveals it immediately. EIFS is a different system with different requirements. If it's been applied incorrectly—or if it's stucco on top of foam with no drainage layer—it's a future failure.
Failure mode 2: Stucco applied directly to studs with no sheathing I've seen this in older homes. The lath is attached directly to the studs, with no sheathing—just the lath and the stucco. This creates a single layer that can't drain properly and has no structural integrity. The hammer test reveals this as a dull, dampened sound. The peel test shows the lath and the studs with nothing in between.
Failure mode 3: Stucco with no proper flashing at windows and doors Water intrusion at window and door openings is the most common cause of stucco failure, in my experience. The hammer test won't show this—you need the peel test around the opening to reveal the lack of flashing or the improper drainage detail.
Failure mode 4: Stucco with a too-thin finish coat The finish coat is the final, textured layer. It should be about 1/8 inch thick. If it's thinner—sometimes 1/16 inch or less—it will crack much more easily. The hammer test on a thin finish coat often sounds hollow. The peel test reveals a finish coat that's too thin and a brown coat that's exposed.
The economic cost of stucco failure
I've done the math on repair costs for failed stucco jobs:
Hammer-test hollow spots (minor delamination): $1,000-3,000 for crack injection and stucco patch (if caught early)
Peel-test missing drainage plane: $3,000-8,000 to install a drainage mat and re-coat the stucco
Peel-test missing weep screed: $1,500-4,000 to add a weep screed at the bottom of the wall
Missing flashing at windows/doors: $2,000-5,000 to remove the window, flash properly, and re-stucco
Full stucco failure (rotted sheathing, structural damage): $15,000-30,000 for full tear-off and replacement
The average repair cost for a stucco job that fails within 10 years is about $8,000. That's a significant cost—often more than the original installation.
What I've learned from 20+ stucco failures

I've inspected, repaired, or fully replaced over 20 stucco jobs in the Denver area. Here's what I've learned:
The hammer test is good for spotting delamination, but the peel test is the gold standard. The peel test tells you everything about the system's installation—the thickness, the lath, the drainage plane, the sheathing condition, the weep screed. I won't sign off on a stucco job without doing a peel test.
The drainage plane is the most important detail. I've seen stucco jobs with excellent materials and beautiful finish coats fail because the drainage plane was missing. Water has to go somewhere. If it's trapped against the sheathing, it's going to rot.
The weep screed is non-negotiable. In Colorado's freeze-thaw climate, water needs a way out at the bottom of the wall. A weep screed is the cheapest insurance you can buy. I've seen failures that could have been prevented with a $200 weep screed.
The lath must be properly attached. Loose lath, incorrectly spaced lath, and lath that's attached to the sheathing with insufficient fasteners are all problems I've seen. The lath's only job is to hold the stucco to the wall. If it's not doing that, the stucco is a facade, not a wall covering.
Curing matters. Stucco that dries too fast cracks. Cracking lets water in. Water freezes, expands, and the stucco falls off. It's a sequence that takes 5-10 years, but it's preventable by proper curing.
The field-ready checklist
Here's the checklist I use on every stucco inspection. You can use it on your own house, or as a set of questions for your contractor.
Hammer Test (exterior, every stucco panel)
Tap the stucco at eye level (5-6 feet up) across the entire wall.
Tap at corners, near windows, and at the base of the wall.
Listen for the sound: solid "tink" = good; hollow "thud" = delamination.
Mark any hollow spots with tape or chalk for later repair.
If hollow spots cover more than 5% of the wall, recommend further investigation.
Peel Test (one location per wall, about 6 inches above the ground)
Cut a 4-inch square opening in the stucco at the base of the wall.
Measure the stucco thickness: 3/4 inch to 1 inch = acceptable.
Inspect the lath for rust and attachment.
Check for a drainage plane (a gap or a drainage mat between lath and sheathing).
Inspect the sheathing behind the stucco (should be dry and intact).
Check for a weep screed at the bottom of the wall (should be visible, not covered).
Check that the weep screed is continuous and not blocked by stucco or grading.
Document everything with photos.
Additional checks
Check all window and door openings for proper flashing.
Look for cracks: hairline (minor), wider than 1/16 inch (more serious), or step cracks at corners (structural concern).
Inspect the stucco at the bottom of the wall for moisture stains or efflorescence (white, chalky deposits).
Check for gaps at the eaves, gutters, or roof lines (where water can enter).
Check for signs of insect damage (termite tubes, etc.).
Check the stucco's color and finish for consistency (UV damage may indicate uneven exposure).
What to do if you find issues
Small hollow spot: patch or inject crack sealant.
Large hollow spot: remove and re-install the stucco in that area.
Missing drainage plane: install a drainage mat or retrofit a rainscreen.
Missing weep screed: add a weep screed and ensure it's continuous.
Rotting sheathing: remove, repair, and re-cover.
Cracked stucco: repair cracks and seal with a high-quality stucco sealant.

No notes on this sheet yet.