What spray foam does that nothing else can
Let me be clear: spray foam is not overhyped.
Closed-cell spray foam delivers R-6 to R-7 per inch, compared to R-3.5 for fiberglass batts and R-3.8 for dense-packed cellulose. It forms a continuous air barrier when properly applied, eliminating the convective losses that plague cavity insulation. And it bonds directly to the substrate, reducing the risk of settling, compression, or gaps over time.
Open-cell foam offers lower density (about R-3.6 per inch) but provides excellent sound attenuation and is more forgiving of substrate irregularities. It's cheaper than closed-cell and still outperforms batts as an air barrier.
I've specified both types on projects across the Denver area. When they're done right, they're transformative. A house insulated with well-installed spray foam will have lower energy bills, fewer drafts, and a more comfortable interior than any batt-insulated house I've ever seen.
But here's the catch: spray foam is also the most installation-sensitive insulation on the market. Get it wrong, and the consequences are not just a cold spot. They're structural rot, indoor air quality problems, and fire safety issues that the building inspector will miss.
The four things that determine whether spray foam works
After cutting open enough spray foam jobs—some successful, some complete disasters—I've narrowed the field failure modes down to four recurring issues.
Every one of these is an installation variable, not a product defect. Every one of them can be caught and corrected before the drywall goes up. And every one of them is routinely missed by contractors who assume the foam "just works."
Here's what you need to watch for.
Thing 1: Apply it at the right temperature—or walk away
Spray foam is a chemical reaction. The two components—isocyanate and polyol resin—are heated, pressurized, and mixed at the spray gun. The reaction is exothermic: it releases heat as it cures.
The catalyst and blowing agent are calibrated for a specific substrate temperature range—typically 60°F to 80°F for the substrate (not just the ambient air). If the substrate is too cold, the chemical reaction slows down, the foam doesn't fully expand, and the cell structure stays closed or partially open, reducing R-value and compromising the air seal.
If the substrate is too hot, the reaction accelerates too quickly, and the foam can overexpand, distort the framing, or produce excessive off-gassing of unreacted components.
In Colorado, the field temperatures are routinely outside this range. Framing lumber sits on site in January at 15°F. The spray foam crew arrives, heats the components in their trailer, and starts spraying. The substrate temperature never reaches the required minimum. The foam "looks" like it's curing—it expands, it hardens, it turns yellow—but the internal cell structure is compromised.
I've cut out foam that was applied at 30°F substrate temperature. The foam was brittle, crumbly, and had an off-white discoloration indicating incomplete cure. Its effective R-value was closer to R-3 than R-6. The air seal was also compromised—the foam had shrunk away from the framing as it cooled.
What to do: Ask the installer what the substrate temperature is before they start. If they don't have a non-contact infrared thermometer on site, that's a red flag. If the substrate temperature is below 55°F, tell them to come back on a warmer day. No exception.
Thing 2: Thickness matters—and the spec sheet isn't a guarantee
 vs. bad cure (off‑white, brittle, crumbly) from cold substrate")
Closed-cell spray foam has a maximum applied thickness per pass. The exact limit varies by product, but the manufacturer's spec sheet will state it clearly—typically 1.5 to 2 inches per pass. Apply it thicker in one pass, and the foam can overheat, scorch, or produce poor cell structure at the core.
Open-cell foam can be applied in thicker passes, typically up to 3-4 inches, but it's still limited.
In the field, what I see is installers trying to get the job done faster by laying down a single thick pass instead of multiple thin passes. The foam looks fine on the surface, but the interior overheated—the exothermic reaction couldn't dissipate the heat quickly enough. The result is a foam layer that performs inconsistently: the exterior surface is dense and well-cured, but the interior core is brittle and low-density.
I tested a wall section from a job in Aurora where the install was supposed to be a single-pass 3-inch layer. The installer had applied it in one thick pass. The exterior 1.5 inches of foam were correctly closed-cell; the interior 1.5 inches had overheated and formed a lower-density, partially open-cell structure with about R-3 per inch instead of R-6.
What to do: Confirm the pass thickness with the installer before they start. Write it into the contract. Better yet, verify the thickness yourself by checking the foam depth at the top and bottom plates before the drywall covers it. It's a ten-minute check that catches a common shortcut.
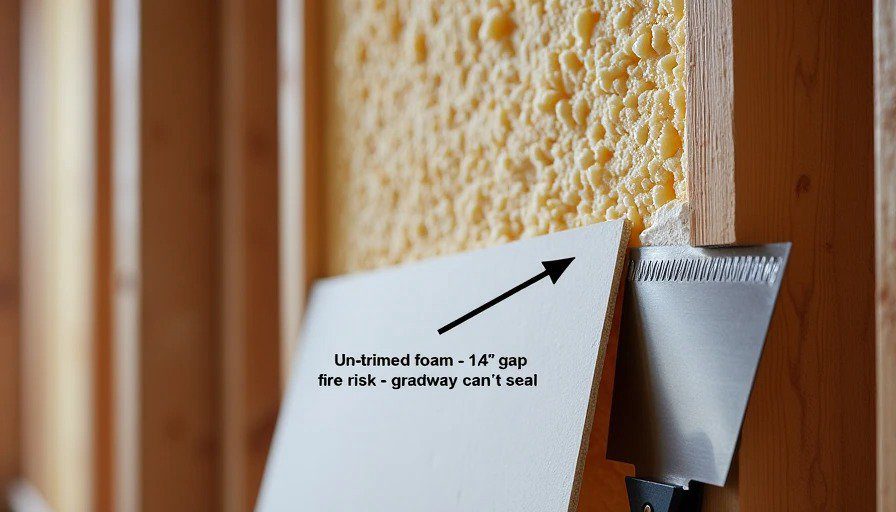
Thing 3: Trim it flush—or it becomes a fire risk
Spray foam expands during curing. Installers who apply a thick layer at the top of a wall cavity often create a "divot" or a bulge that sticks above the framing. The foam expands beyond the plane of the studs, creating an irregular surface that the drywall can't sit flat against.
The conventional fix is to trim the foam flush with the studs using a serrated knife, a special grinder, or a saw-tooth blade. Trimming also exposes fresh foam cells, creating a flatter surface for drywall attachment.
But here's the safety concern I see overlooked most often: spray foam is a combustible material. The foam itself is treated with a fire retardant, but it still supports combustion. In the cavity, it's normally protected by the drywall. But if the foam is left protruding beyond the stud face, the drywall can press against it, compressing the foam and potentially leaving a gap at the edge of the drywall. That gap is a pathway for flame spread in a fire event.
I've inspected walls where the installer left the foam un-trimmed at the top of the cavity, then the drywall crew installed the sheetrock over it. The drywall sat proud of the framing on one side, leaving a 1/4-inch gap at the adjacent stud. The foam was exposed—not covered by drywall—in that gap. In a fire, that foam would have provided a direct path for flame spread within the cavity.
Thing 4: Install a thermal barrier or ignition barrier—or you're breaking code
This is the one most homeowners don't know to ask for.
International Building Code (IBC) requires that spray foam, like all foam plastics, be separated from the occupied space by a 15-minute thermal barrier—typically 1/2-inch gypsum board. That's the drywall. It's there to protect the foam from ignition sources in the home and to delay the onset of flame spread in a fire event.
In attic spaces and crawl spaces, where drywall isn't required, the code requires an ignition barrier—a coating or material that prevents ignition. This can be a 1/2-inch gypsum board, a 3/8-inch wood panel, or a specific fire-retardant coating applied to the foam.
I've walked into attics where the spray foam was exposed—no drywall, no ignition barrier, no coating. The homeowners had no idea. Their HVAC contractors had installed furnaces and lights directly adjacent to exposed foam. This is not only a code violation; it's a serious safety hazard.
What I check before I certify a spray foam job

When I'm doing a pre-drywall inspection on a house with spray foam, I have a standard checklist. Here's what I verify before I sign off:
Substrate temperature log. I ask the installer to provide the substrate temperature at the time of application. If they can't, I consider it a yellow flag.
Pass thickness verification. I take a depth measurement at the top and bottom of the cavity. I'm looking for consistent thickness across the entire wall. A variance of more than 1/4 inch per foot of depth indicates uneven application.
Cure quality check. I press a small section of foam with a thumb—the foam should be firm but slightly compressible. If it crumbles or feels unusually soft, the cure is incomplete.
Trim flushness. I check that the foam is flush with the stud face. Any protrusion or gap is a red flag.
Thermal barrier confirmation. I verify that the drywall or ignition barrier is installed over every foam surface that's accessible from the occupied space.
These are basic quality-control checks. They take about fifteen minutes. And they catch the majority of installation issues that can compromise the foam's performance or create safety hazards.
When spray foam still makes sense
Despite these caveats, I still spec spray foam on many projects—especially high-performance custom homes, additions where space is tight (the high R-value per inch is critical), and jobs where air sealing is a priority.
But I specify it with explicit installation requirements, not just "spray foam insulation." The contract includes the temperature requirements, the pass thickness, the trim requirement, and the thermal barrier detail. I also make the installer provide an installation log with date, substrate temperature, and pass thickness recorded.
The difference between a spray foam job that performs as advertised and one that fails in the first five years is almost always in the installation details—details that are often left to the installer's discretion if no one is watching.
No notes on this sheet yet.